The schematic and code are at the bottom of the post.
The problem
While researching how to create a DIY MPPT solar charge controller I noticed that I would need an inductor with a certain value. I have a bunch of salvaged ones but had no idea what their inductance values were. I needed to find a way to measure them without counting turns and measuring diameters.
Solution
Arduino-based inductance meter using a couple of capacitors and an LM339 comparator. It can measure from just under 1uH and up to full Henrys!
Bill of Materials
- Arduino Nano
- LM339 comparator
- Ceramic Capacitors (2 x 1uF)
- Resistors (150 Ohm, 2K Ohm)
- OLED Display (0.96 inch, I2C, 128X64, SSD1306)
The Details
Arranging an inductor and a capacitor in a certain way and pulsing voltage for a brief period of time makes the circuit resonate. The frequency at which an inductor resonates can be used to determine the inductance value. Oh Henry!

The formula for resonant frequency is the following, given L is inductance, C is capacitance.

Which we can rearrange to give us the inductance:

Inductor’s resonance in the circuit can be converted into a square wave using the LM339 comparator and measured with arduino. Arduino has a function called pulseIn which can detect and measure pulses that are more than 3 microseconds long.
Given the chosen capacitance for this project is 2uF we can do some calculations and see what the resolution of this measurement method is at that limit of 3uS. In other words, what is the lowest inductor value we can measure.
The formula for frequency is 1 over period. Period is double the pulse width.

For a pulse of 3uS we get f = 166,666.667Hz. In this project the capacitance (C) is 2uF. We can substitute these values into the inductance formula above:

Solving the equation results in L = 0.456 microhenrys (uH) for a 3uS pulse. That’s is the lower limit for measuring inductance using this method with Arduino Nano. That will serve my purposes just fine.
For a pulse width of 4uS we get inductance of 0.81uH.
| Pulse Width (uS) | Inductance (uH) |
| 3 | 0.46 |
| 4 | 0.81 |
| 5 | 1.27 |
| 6 | 1.82 |
| 7 | 2.48 |
| … | … |
So that’s the math involved in calculating inductance. Let me know if you have any questions.
Sample Measurements
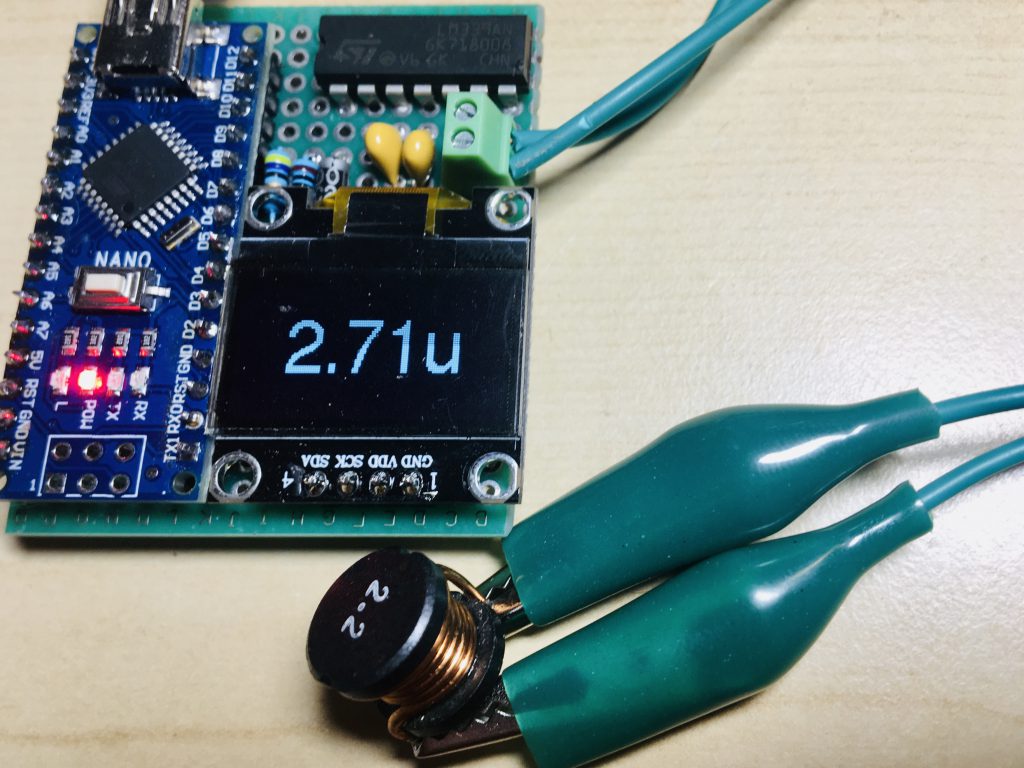
I had two inductors with marked values. One marked 2.2 and another one 220. I am assuming those are 2.2uH and 22uH respectively. Using this DIY inductance meter I was able to get close but since they are at the bottom of this meter’s capabilities the measurements were 10+% off. I find it to be an acceptable tolerance for my purposes.


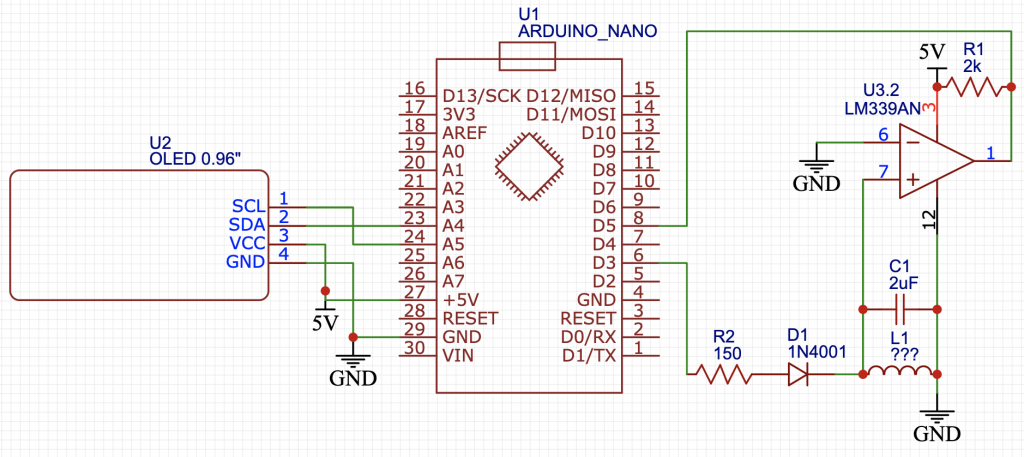
Schematic

Code
We need to include Adafruit libraries to use the OLED display as well as use the fonts provided by the GFX library.
Then we need to set which pins on Arduino are doing the work. PIN_PULSE for the pin that goes HIGH and LOW to saturate the inductor. And PIN_IN to measure the pulse.
CAPACITANCE contains the value of your capacitors. I measured mine with a very good multimeter and the combined value was almost 10% off which makes a difference in the calculation.
Lastly, NUM_SAMPLES tells it how many samples to take and then average out before updating the display.
The code is set up to measure at just over 2Hz. So NUM_SAMPLES = 2 updates display about once every second.
It will display --- when it’s not detecting any pulses. It will flash ~ while collecting samples and the units will automatically scale with the magnitude of inductance. For example, 2.71uH will be displayed as 2.71u, 65.3mH as 65.3m and 2.74 full Henrys will display simply as 2.74.
#include <Adafruit_GFX.h>
#include <Adafruit_SSD1306.h>
#include <Fonts/FreeSans18pt7b.h>

#define PIN_PULSE         3
#define PIN_IN            5
#define CAPACITANCE       1.83e-6 // I measured my capacitors using a multimeter
#define NUM_SAMPLES       2

// these three are needed to center text
#define DISPLAY_WIDTH     128
#define DISPLAY_HEIGHT    64
#define FONT_HEIGHT       18

Adafruit_SSD1306 display(DISPLAY_WIDTH, DISPLAY_HEIGHT);

float pi_and_capacitance = M_PI * M_PI * 4 * CAPACITANCE;
double pulses[NUM_SAMPLES];
int pulse_index = 0;
int num_faults = 0;
bool errorred_out = false;

void setup(){
  Serial.begin(115200);

  pinMode(PIN_IN, INPUT);

  display.begin(SSD1306_SWITCHCAPVCC, 0x3C);
  display.clearDisplay();
  display.setTextColor(WHITE);
  display.setTextWrap(false);
  display.dim(0);
  display.setRotation(2);
  display.setTextSize(0);
  display.setFont(&FreeSans18pt7b);
}

void display_string(const char* str) {
  int16_t x1, y1, w, h;
  int16_t y = (DISPLAY_HEIGHT + FONT_HEIGHT) / 2;

  display.getTextBounds(str, 0, 0, &x1, &y1, &w, &h);
  display.setCursor((DISPLAY_WIDTH - w) / 2, y);

  display.clearDisplay();
  display.println(str);
  display.display();
}

double calc_inductance(double pulse) {
  double frequency = 1E6 / (2 * pulse);
  return 1E6 / (frequency * frequency * pi_and_capacitance);
}

int get_number_of_decimals(unsigned int order) {
  switch (order % 3) {
    case 0:
      return 0;

    case 1:
      return 2;

    case 2:
      return 1;
  }
}

int get_magnitude(unsigned int order) {
  if (0 != order) return (int) ((order - 1) / 3);

  return 0;
}

void get_display_string(double inductance, char *buff) {
  unsigned int order = (unsigned int) ceil(log10(round(inductance)));
  int magnitude = get_magnitude(order);
  int num_decimals = get_number_of_decimals(order);
  double display_number = round(inductance / pow(1000, magnitude) * pow(10, num_decimals)) / (double) pow(10, num_decimals);
  char unit = "\0";

  switch (magnitude) {
    case 0:
      unit = 'u';
      break;

    case 1:
      unit = 'm';
      break;
  }

  Serial.print("INDUCTANCE: ");
  Serial.print(inductance);
  Serial.print(", ORDER: ");
  Serial.print(order);
  Serial.print(", MAGNITUDE: ");
  Serial.print(magnitude);
  Serial.print(", DECIMALS: ");
  Serial.print(num_decimals);
  Serial.print(", NUMBER: ");
  Serial.print(display_number);
  Serial.print(", UNIT: ");
  Serial.println(unit);

  dtostrf(display_number, 3, num_decimals, buff);

  sprintf(buff, "%s%c", buff, unit);
}

double get_average_pulse() {
  double average_pulse = 0;

  for (int i = 0; i < NUM_SAMPLES; i++) {
    average_pulse += pulses[i];
  }

  return average_pulse / (double) NUM_SAMPLES;
}

void report_inductance() {
  char buff[20];
  double average_pulse = get_average_pulse();
  double inductance = calc_inductance(average_pulse);

  get_display_string(inductance, buff);

  display_string(buff);
}

void report_fault() {
  display_string("---");
}


void report_aquisition() {
  display_string("~");
}

void pulse_inductor() {
  pinMode(PIN_PULSE, OUTPUT);
  digitalWrite(PIN_PULSE, HIGH);
  delay(10);
  pinMode(PIN_PULSE, INPUT);
}

void drain_inductor() {
  pinMode(PIN_PULSE, OUTPUT);
  digitalWrite(PIN_PULSE, LOW);
}

double read_pulse_length() {
  double pulse = pulseIn(PIN_IN, HIGH, 30000);
  return pulse;
}

void loop(){
  pulse_inductor();
  double pulse = read_pulse_length();
  drain_inductor();

  if (pulse) {
    if (errorred_out) {
      report_aquisition();
    }

    num_faults = 0;
    pulses[pulse_index] = pulse;

    if (pulse_index == NUM_SAMPLES - 1) {
      errorred_out = false;
      report_inductance();
    }

    pulse_index = (pulse_index + 1) % NUM_SAMPLES;

  } else {
    num_faults += 1;

    if (num_faults == ((NUM_SAMPLES / 3) + 1)) {
      errorred_out = true;
      report_fault();
    }
  }

  delay(400);
}
Leave a Reply